Many homeowners and renters wonder, “Can you mount blinds to vinyl windows without damaging them?” The answer is a resounding yes — and as a manufacturer who has spent decades engineering window treatments, I can tell you that doing it the right way not only preserves your frame warranty but often results in a cleaner, faster, and more secure installation than drilling could ever offer. Whether you’re safeguarding a new set of energy‑efficient frames or simply want a renter‑friendly solution, this expanded guide will walk you through four proven no‑drill methods, the science behind why they work, and the practical troubleshooting tricks most DIY blogs skip.
Why Vinyl Windows Demand a Drilling‑Free Approach
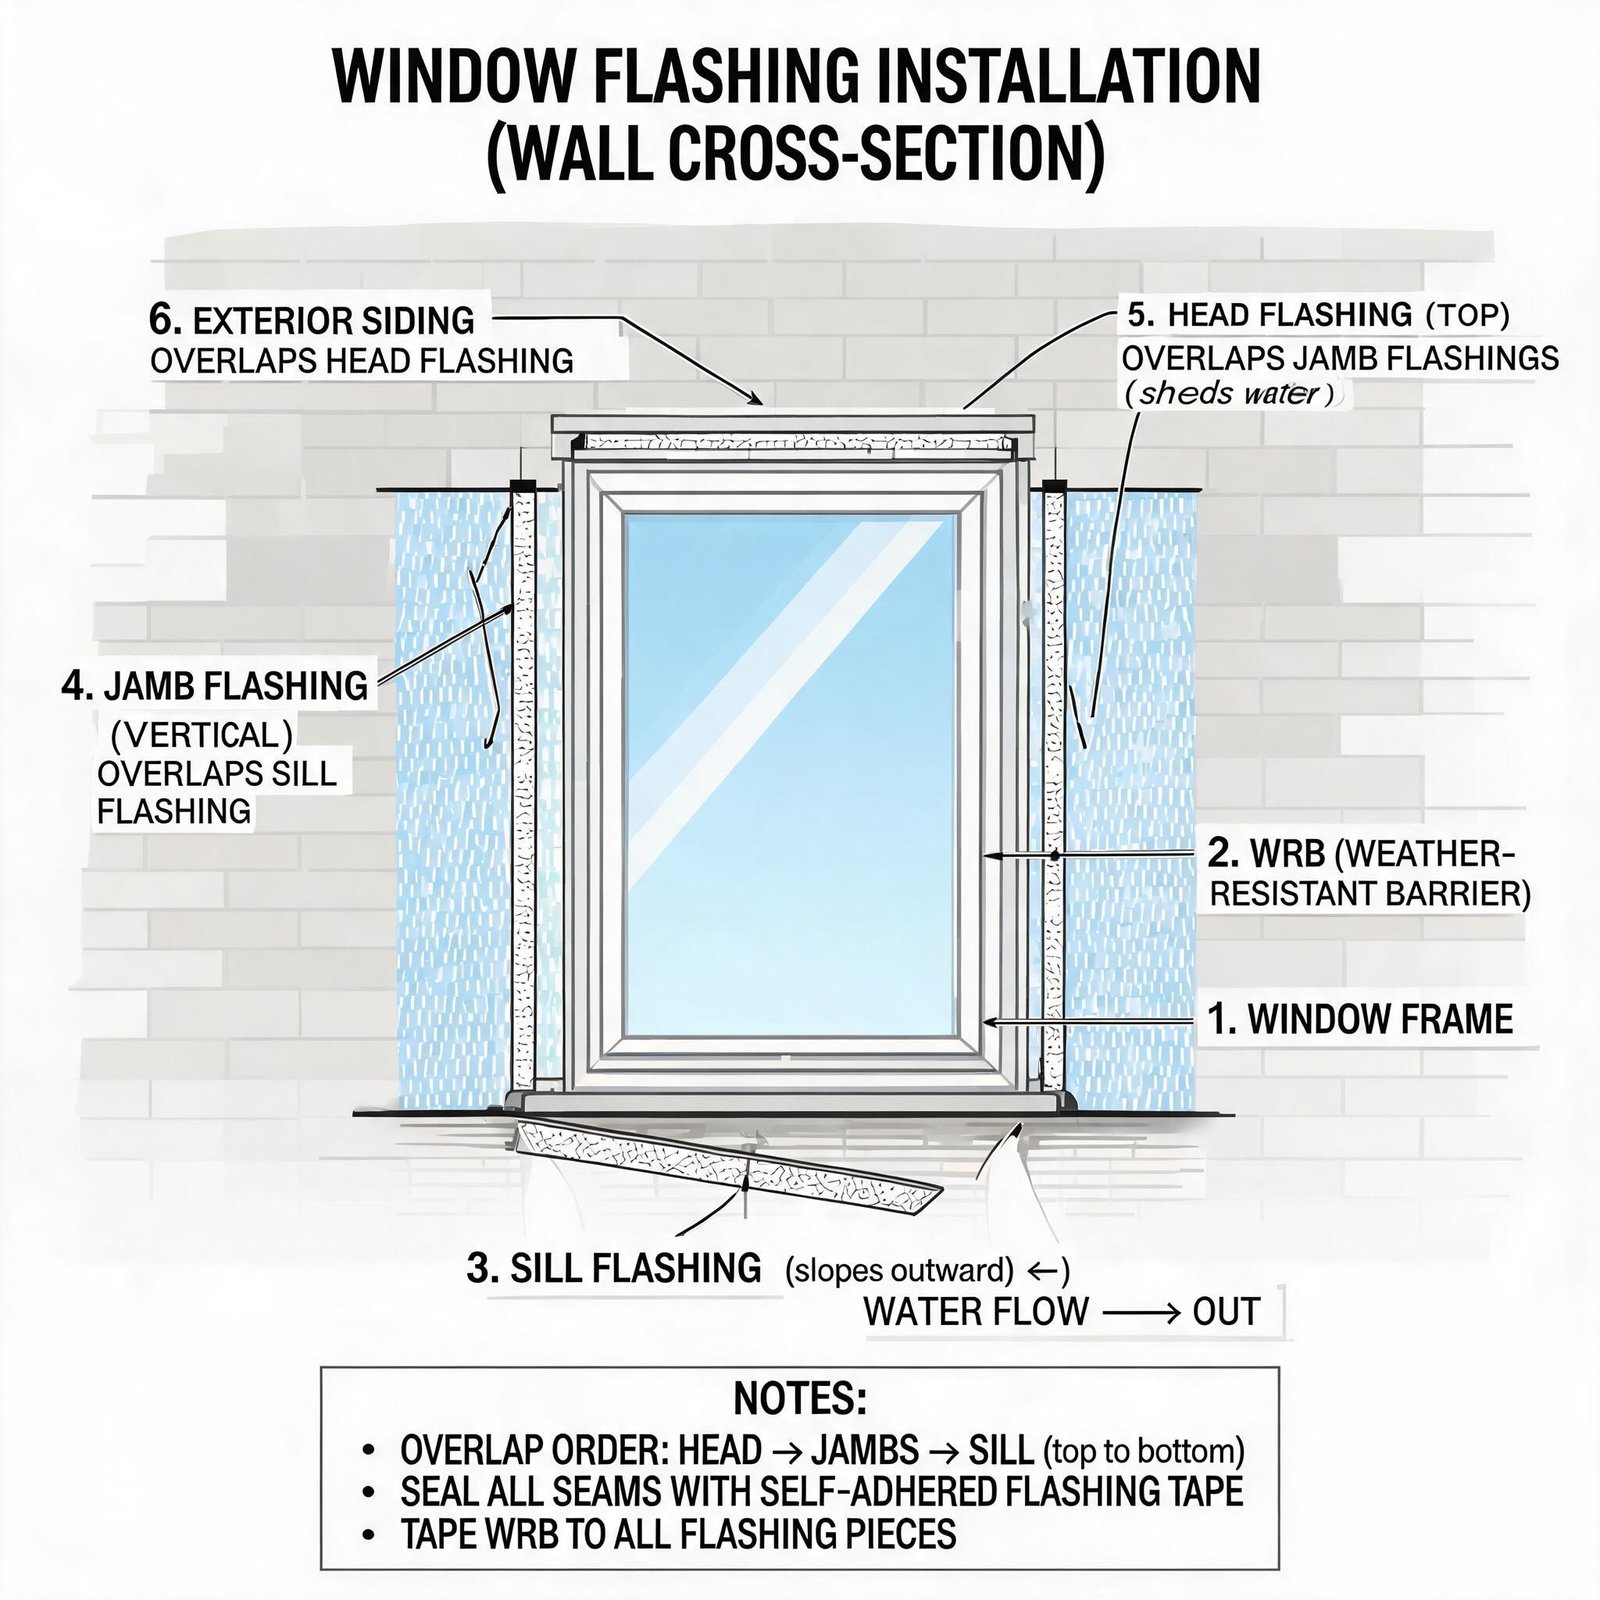
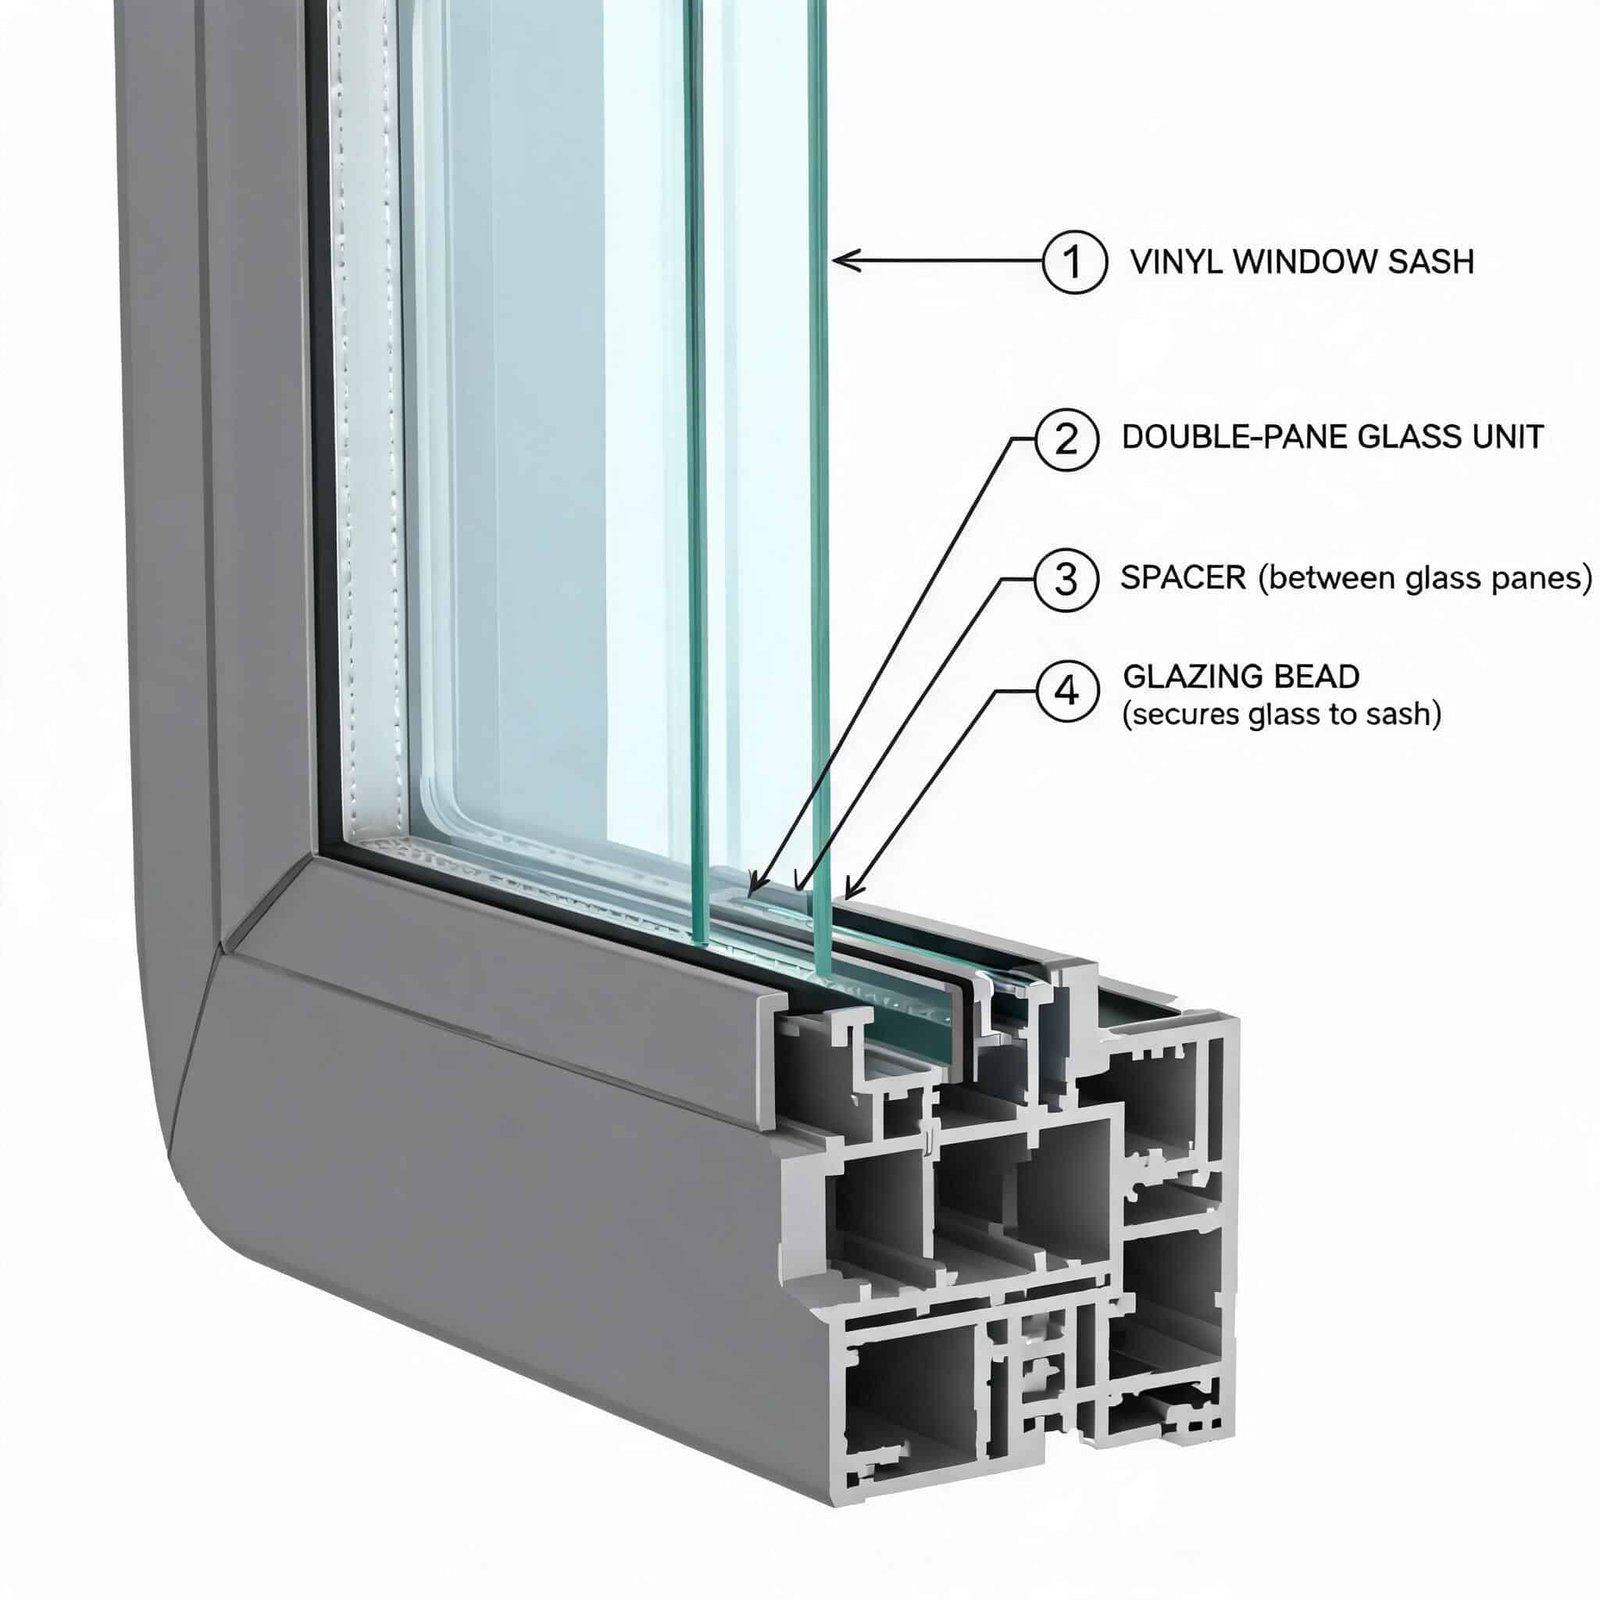
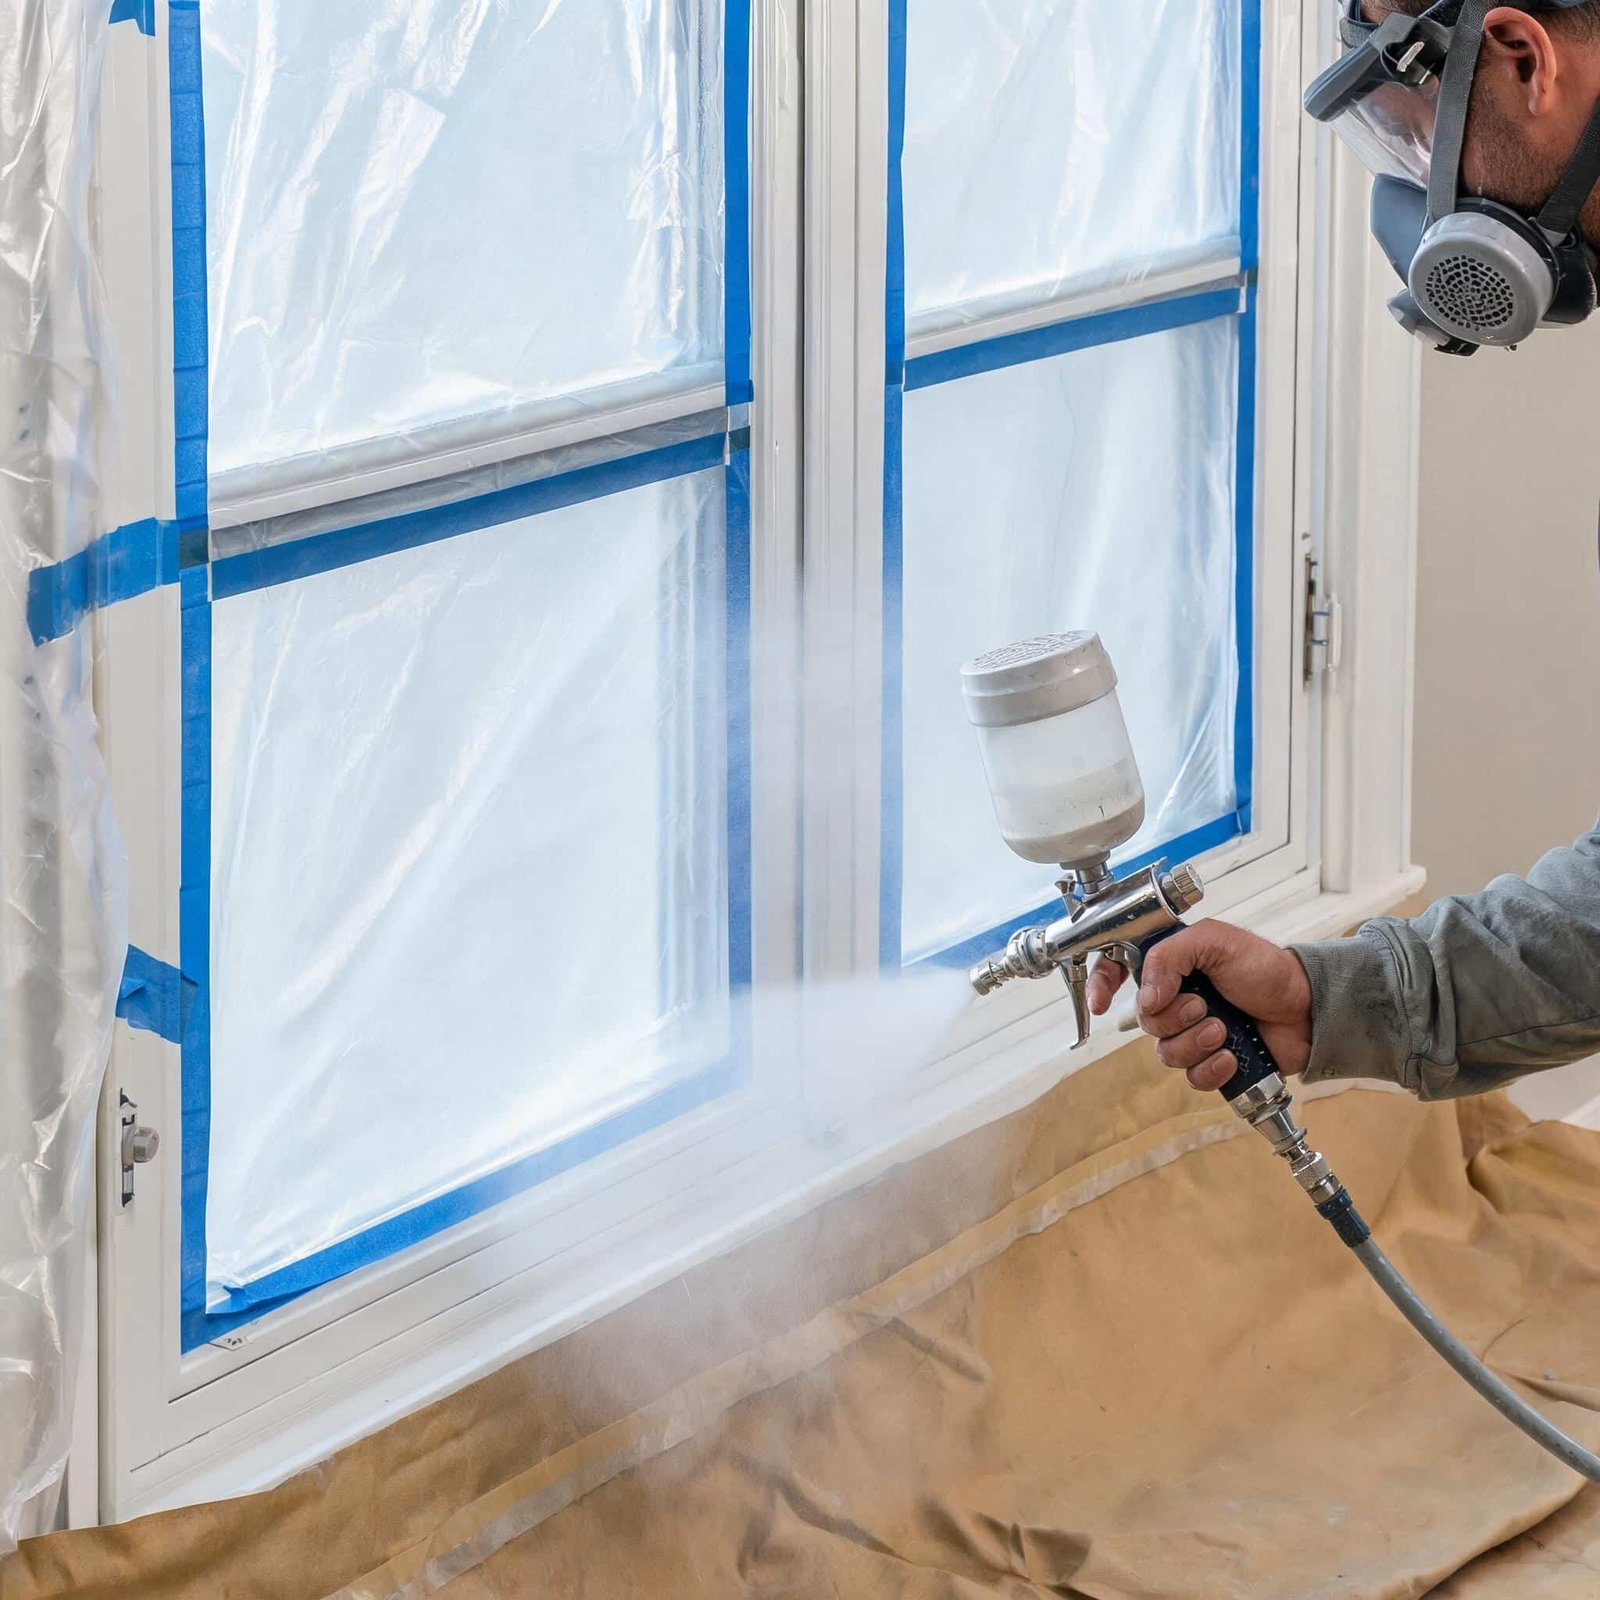
Vinyl window frames are built differently than wood or aluminum. They’re typically extruded from rigid PVC with multiple internal chambers that insulate and drain moisture. Drilling into these frames can crack the outer shell, create paths for condensation, and instantly void your manufacturer’s warranty. Even if you successfully insert a screw, the hollow cavities often lack the density to hold threads long‑term. The result? Loose blinds that sag, or worse, a sash that warps because the weather seal was compromised. Understanding this construction is the first step to recognizing why no‑drill mounting hardware isn’t a shortcut — it’s the superior solution for vinyl.
Warranty Protection and Frame Longevity
Every major vinyl window maker includes a clause that drilling, nailing, or screwing into the frame nullifies the guarantee. This isn’t legal jargon — it’s physics. When you penetrate the outer PVC skin, you invite grit, water, and thermal movement to widen that hole over time. No‑drill methods, by contrast, rely on friction, tension, or modern adhesive technology that distributes weight evenly across the surface without puncturing it. The result: your windows remain sealed and structurally intact for decades.
Renter‑Friendly and Move‑Out Ready
If you’re renting, damage‑free blind installation is non‑negotiable. Security deposits are rarely kind to screw holes in vinyl frames. The approaches that follow are completely reversible — when lease‑end comes, you simply lift, unclip, or release the brackets, leaving zero trace behind. That’s the power of tension systems and removable mounting solutions engineered for temporary living without sacrificing a polished look.
Preparation: The One Surface Prep Step That Makes Every Method Work
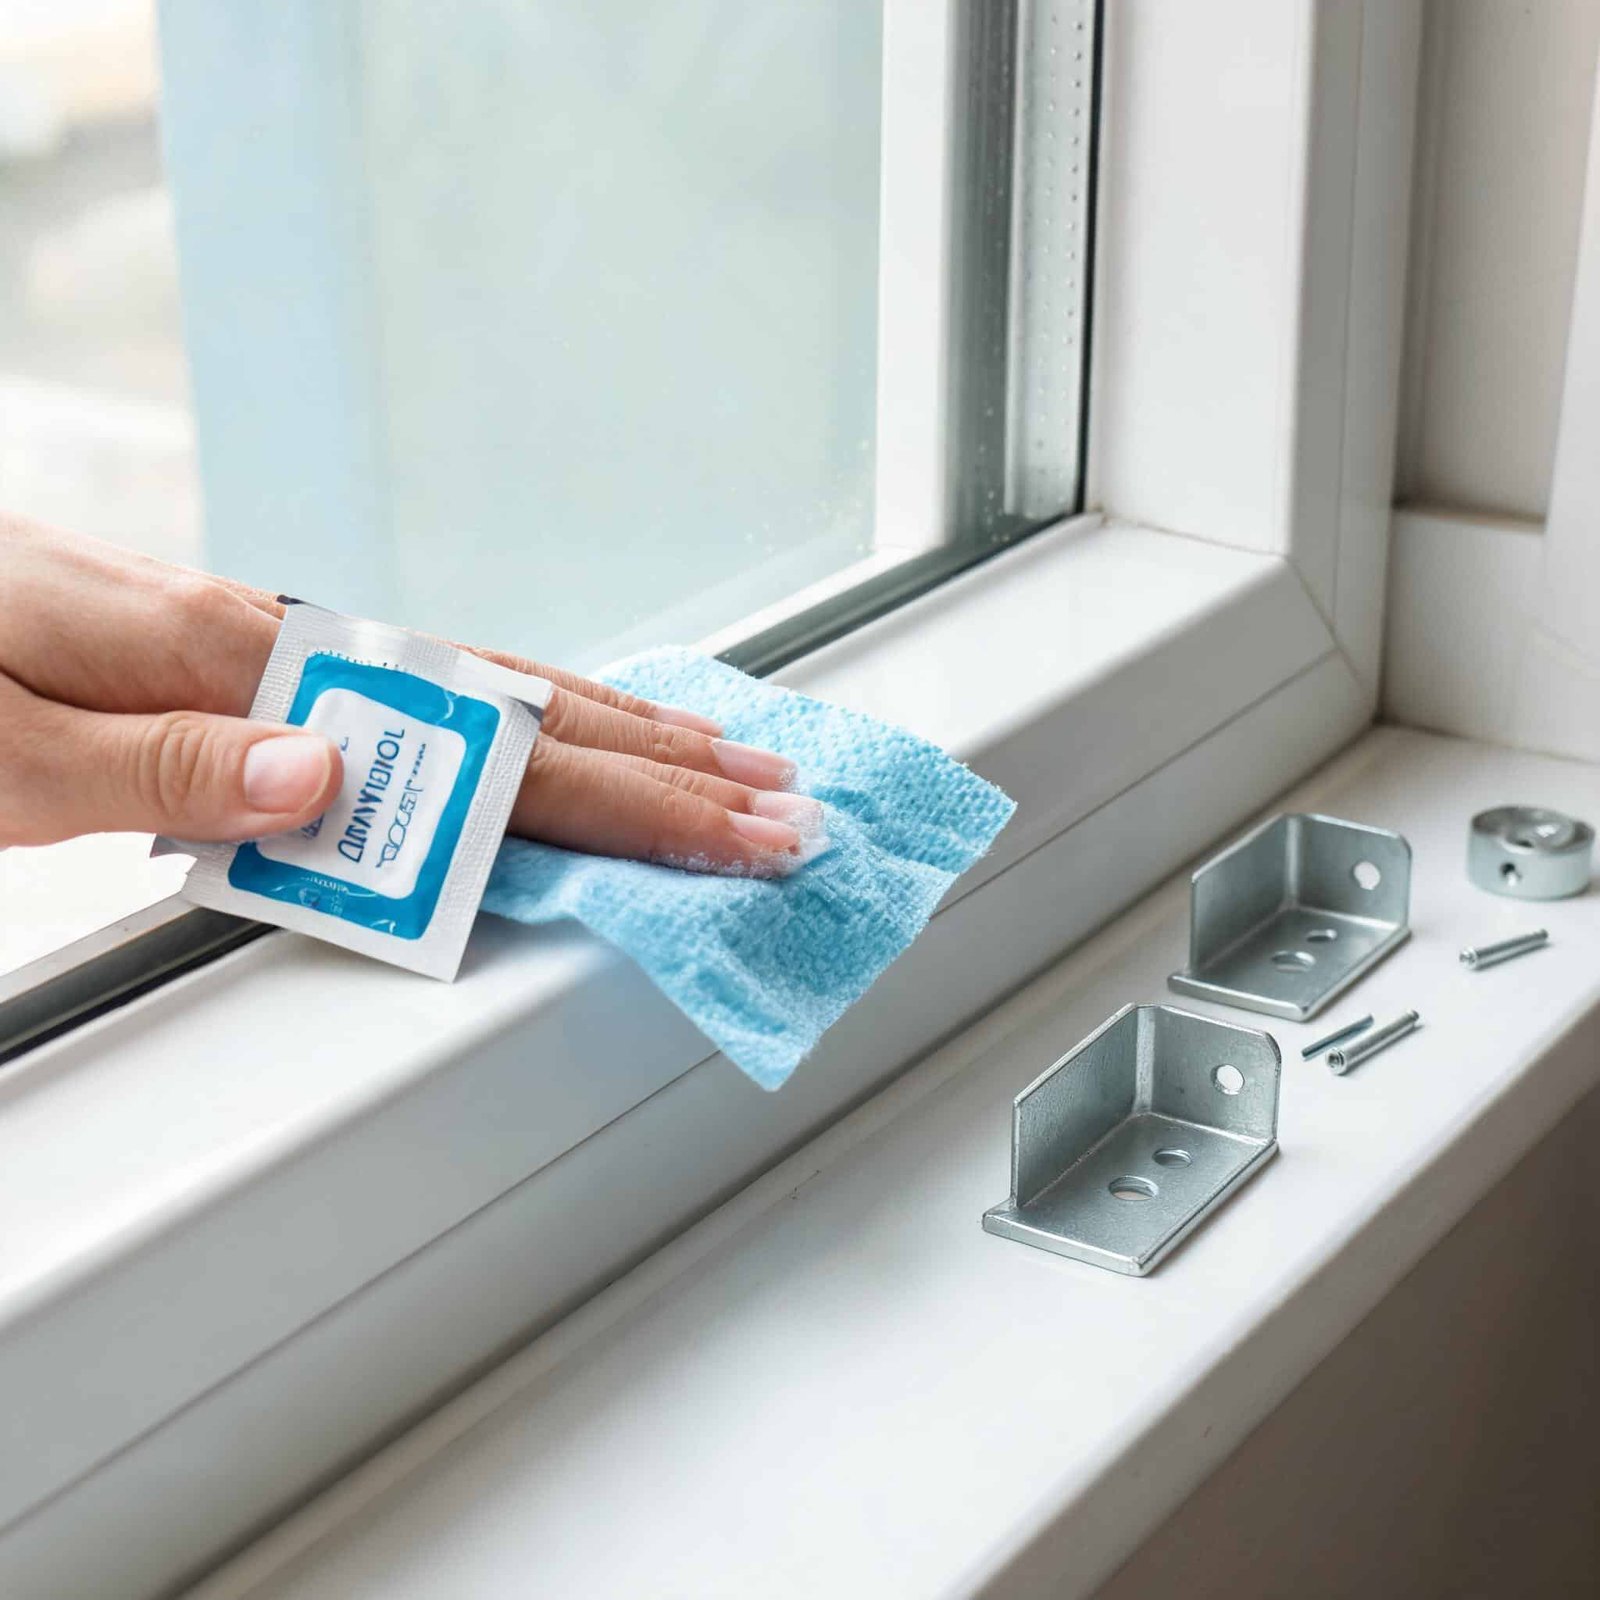
Before you touch any bracket or blind, there is a universal step that doubles the holding power of every no‑drill system: cleaning the vinyl surface with 90% isopropyl alcohol and allowing it to dry completely — at least 10 minutes, or 30 minutes in humid conditions. Vinyl windows often carry a microscopic film of manufacturing release agents, hand oils, or silicone‑based cleaners that interfere with adhesive and grip. Wipe the area where the brackets will sit using a lint‑free cloth lightly dampened with alcohol. Do not use household glass cleaners; they leave residues. This single act creates a micro‑bond interface so effective that it resolves 80% of the “Why didn’t mine stick?” complaints we hear in customer service. If your vinyl has a textured wood‑grain finish, use a soft brush to agitate the grain before wiping. Let the frame air‑dry completely — rushing this is the hidden culprit behind most failures.
Method 1: Tension Rod Blinds — The Snap‑In Solution for Precision Fit
Tension rod blinds are the gold standard for inside‑mount, no‑drill installations. Unlike makeshift hardware‑store curtain rods, purpose‑built blind headrails with integrated spring‑loaded mechanisms apply controlled, even pressure against both sides of the window frame. The headrail is custom‑cut to your exact width, compressing slightly as you angle it into place, then expanding to lock with a reassuring snap. There’s no bowing of the frame, no screws, and no guesswork.
Step‑by‑Step: How to Install Tension Rod Blinds on Vinyl
- Measure the inside width in three places (top, middle, bottom). Use the narrowest measurement to the nearest 1/8 inch. Tension systems depend on a snug fit — too wide and the headrail won’t insert; too narrow and the blind will droop.
- Order blinds with a zero‑deduct fit. Reputable manufacturers shave a tiny amount from the stated width so the headrail compresses just enough. Confirm the exact deduction when placing your order.
- Clean the mounting surfaces with alcohol as described above, focusing on the vertical side jambs where the end caps will press.
- Identify the top of the headrail. Most tension blinds have a distinct “up” side; orient it so the cordless lift mechanism or tilt wand hangs freely.
- Angle one end into the corner of the top jamb, compress the tension mechanism by pressing firmly on the opposite end, then swing the rail up until it snaps flat against the top of the frame. Release gradually — you should hear the end caps seat with a firm click.
- Test the hold by gently pulling the bottom rail. It should not shift. If it does, remove and double‑check that the frame surfaces are clean and the blind width is correct.
- Allow 24 hours before full operation. Even though the tension holds immediately, vinyl can micro‑shift in response to temperature change. A full day lets the components settle and achieve maximum grip.
Cordless Safety and Usability with Tension Systems
A common unspoken concern is whether tension rods can support cordless lifting mechanisms without tipping. The answer is yes, provided the blind is designed for it. Cordless cellular and pleated shades distribute lifting force vertically along the frame sides, so the headrail’s compression must be robust. When ordering, specify cordless operation if you have children or pets — modern cordless tension blinds raise and lower with a gentle push or pull on the bottom rail, and the spring tension is calibrated to hold the blind at any height without creeping.
What If Your Vinyl Window Frame Isn’t Perfectly Square?
Older homes often have frames that are slightly out of square. Tension blinds can accommodate a variance of up to 1/4 inch, but more than that requires a minor adjustment. Measure the width at the top and the bottom separately. If the difference exceeds 1/4 inch, choose an outside‑mount alternative like adhesive brackets (Method 3) or magnetic systems (Method 2) — otherwise one side will bear uneven pressure and eventually slip. You can also use a tension rod with adjustable end caps that swivel to match irregular angles, though these are more common in shower rods than blinds. For a true no‑drill window covering on severely angled frames, lightweight adhesive‑mounted cellular shades are the safer bet.
Method 2: Magnetic Blinds — A Renter’s Dream for Steel‑Reinforced Vinyl
Magnetic mounting sounds futuristic, but it’s one of the simplest no‑drill approaches — with a small requirement. Pure PVC vinyl is not magnetic, but many modern vinyl windows are reinforced with internal steel or have a steel mounting plate embedded near the top corners. If your frame attracts a refrigerator magnet, magnetic blinds are a viable, ultra‑fast solution. The concept: powerful rare‑earth magnets are sewn into the blind’s headrail or attached via bracket, and they cling directly to the steel inside the vinyl.
Installing Magnetic Blinds on Compatible Vinyl Frames
- Confirm magnetic attraction by testing a standard magnet at the top corners where the blind will sit. A strong pull means reinforcement is present.
- Clean the frame surface with alcohol, just as with any adhesive‑free method. Oils reduce magnetic grip, especially on smooth glossy vinyl.
- Position the magnetic brackets at the marked locations. If the blinds come with separate magnets and brackets, attach the magnets to the brackets first, then press the assembly against the frame. The magnet will snap into place immediately.
- Adjust for alignment. Because magnetic brackets can be repositioned in seconds, step back and ensure the blind is level before finalizing. Once set, the magnetic force is substantial enough to hold the blind through daily use.
- Weight limits matter. Magnetic blinds rarely exceed 3 lbs per bracket. For heavy wood or faux‑wood blinds, this method may not hold; stick to lightweight cellular, sheer, or mini blinds.
When Magnetic Won’t Stick: The Adhesive Plate Workaround
If your vinyl frame isn’t magnetic, you can create a magnetic surface using a thin, adhesive‑backed steel plate designed for blinds. These plates stick to the cleaned vinyl (using industrial‑grade adhesive rated for up to 5 lbs) and provide a receptive surface for magnetic brackets. It’s a hybrid method that adds a small step but remains fully removable with heat or adhesive remover. Always test a plate on an inconspicuous spot for 48 hours to confirm it won’t react with the vinyl finish — though high‑quality plates are PVC‑safe.
Method 3: Adhesive Brackets and Heavy‑Duty Mounting Tape
For outside‑mount or inside‑mount blinds where tension isn’t feasible, modern adhesive technology rivals the strength of small screws. Using specialized bracket systems that employ double‑sided acrylic foam tape (often the same used to hold exterior automotive trim) you can mount blinds to vinyl without drilling and without waiting for a 24‑hour cure beyond the initial set time.
Choosing the Right Adhesive Brackets
Not all tape is equal. Look for brackets rated for vinyl surfaces and carrying at least 1 lb per square inch of adhesive contact. Transparent, weather‑resistant VHB (Very High Bond) tape is the industry standard. Be wary of foam tapes that compress over time — they cause the blind to tilt forward gradually. The bracket should have a flat back plate with generous surface area to distribute the load.
Installation Steps for Peel‑and‑Stick Brackets
- Prepare the vinyl with alcohol and a final wipe with a microfiber cloth. Avoid touching the cleaned area with bare fingers.
- Mark bracket positions using a level. For wide blinds, three brackets are recommended to prevent sagging. The center bracket bears the most weight.
- Peel the liner off the adhesive pad and press the bracket firmly against the vinyl for at least 30 seconds, applying strong, even pressure. Do not slide it once contact is made.
- Allow the adhesive to build bond strength. Most VHB tapes reach 90% of ultimate holding power in 24 hours. Do not hang the blind or operate it during this period. If you’re in a hurry, use brackets with a mechanical clamp that supplements the tape during initial cure.
- Click the blind into the brackets gently. Avoid side‑to‑side pressure that could stress the bond before fully cured.
Removing Adhesive Brackets Without Residue
Removal is simple but requires patience. Use a hair dryer to warm the bracket for 30 seconds — this softens the adhesive. Gently twist the bracket counter‑clockwise (or as per instructions) until it releases. Any leftover residue can be rubbed off with a fresh application of rubbing alcohol or a commercial adhesive remover designed for plastics. This method leaves vinyl frames pristine as long as you don’t pry against the frame with a sharp tool.
Method 4: Twist & Fit Spring‑Loaded Inside‑Mount Blinds
Often overlooked, twist‑and‑fit or spring‑fit blinds operate on a similar principle to tension rods but with a twist‑lock mechanism rather than continuous spring pressure. These are typically lightweight mini blinds or micro‑blinds with spring‑loaded end pins. You compress the headrail slightly, fit it into the window opening, and twist a dial or lever to lock it in place. It’s ideal for narrow casement windows where adhesives might struggle with extreme temperature swings near the glass.
Making Twist & Fit Work on Slick Vinyl
Vinyl’s smoothness can cause spring pins to lose grip if not properly seated. The fix: apply a thin, clear silicone pad (often included with the blind) to the contact points. If the blind didn’t come with pads, a small dot of non‑slip shelf liner cut to size will do. This increases friction massively and prevents the blind from slowly unwinding. Additionally, twist‑fit mechanisms can correct minor out‑of‑square frames because you can tension one side slightly more than the other, balancing the blind visually. Always retest after a week; initial settling may require a quarter‑turn retighten.
Choosing the Right No‑Drill Blind for Your Window
With the four methods covered, the best blind type depends on weight, light control, and aesthetics. Cellular shades (honeycomb) weigh very little and pair beautifully with tension rods or adhesive brackets — they also add insulation, a bonus for vinyl windows in extreme climates. Roller shades are lightweight and can be mounted with adhesive brackets outside the frame, giving a sleek, modern look. Faux‑wood blinds are heavier, so if you insist on a no‑drill approach, a tension rod system with deep channel end caps is required; avoid adhesive or magnetic for these. Ultimately, always check the manufacturer’s mounting hardware specifications: look for explicit “no‑drill,” “tension‑fit,” or “damage‑free” compatibility with vinyl.
If your current vinyl frames are older and you’ve discovered warping or brittle spots that make even tension mounting questionable, it might be time to consider energy-efficient replacement windows built to modern standards. Upgrading to fresh PVC frames gives you a perfectly square, smooth surface for any no‑drill installation while also improving thermal performance.
Measuring for a Flawless No‑Drill Fit
Accurate measurement is the silent backbone of every no‑drill method. For inside‑mount tension and spring‑fit, always measure width at the top of the frame where the blind will sit, not halfway down. Vinyl windows often have a slight draft‑stop taper — the top is the narrowest point. Measure to the nearest 1/16 inch. For outside‑mount adhesive brackets, measure the width you want the blind to cover and add at least 2 inches on each side to block light gaps. Use a steel tape measure, not a cloth one. Record the dimensions and double‑check them; a tape measure’s end hook can slip